
The basic pattern is a solid square (1 dc in each dc on the sides, [2 dc, ch 2, 2 dc] in the corner spaces), only in two colors. What you're going to do is work with one yarn at a time, and carry the yarn you're not working with by crocheting over it. So, work the first corner as normal with color A. When you get to the second corner, work the first two dcs, drop the working yarn to the front, chain two with color B (the first chain will be in color A, the second in color B), then work the last two dcs with color B. Now work with color B until you get to the fourth corner, and repeat the directions given for the second corner (with A and B reversed). Make sense?
First, the easy directions for those of you who are able to picture things like this.
Work over unused color throughout, from the beginning. Explanation below.
With A, make a magic ring, ch 2
Rnd 1: With A, 2 dc, ch 2, 3 dc all in ring. Drop color A, pick up color B. With B, (ch 2, 2 dc in ring) twice. Close magic ring. Drop color B, pick up color A. With A, ch 2, sl-st into first dc (skip the ch-2).
Rnd 2: With A, standing dc (or ch-2, counts as a dc), dc into same stitch. Dc in next stitch, (2 dc, ch 2, 2 dc) all in corner space, dc in next 3 stitches. 2 dc in corner space, drop color A, pick up color B. With B, ch 2, 2 dc in corner space, dc in next 3 stitches, (2 dc, ch 2, 2 dc) all in corner space, dc in next 3 stitches. 2 dc in corner space, drop color B, pick up color A. With A, ch 2, 2 dc in corner space. Sl-st into first dc of round (or top of ch-2). Fasten off.
I hope that was clear.
Now, for the rest of you.
You're going to be working with two colors. We'll label them A and B so we can distinguish. In these pictures, brown is color A and orange is color B, but obviously you can use whatever colors you would like. Now, you'll be actively working with only one yarn at a time; the other will be carried by working over it. That means when you insert your hook into the next stitch, you will put it under the carried yarn as well, and work the stitch around it. Here's a picture to help you understand.
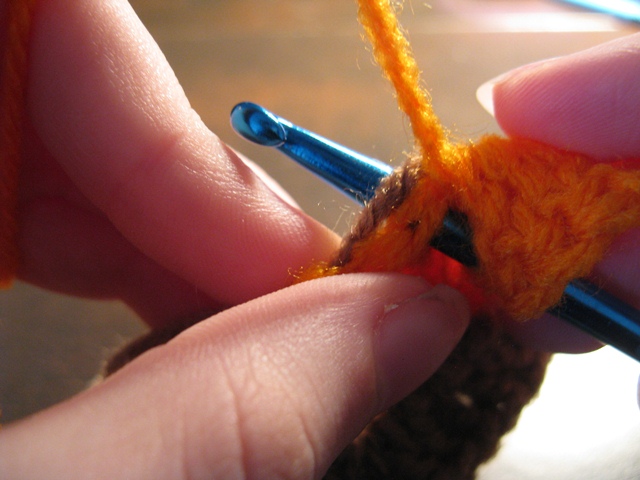 |
| Insert your hook into the stitch and under the carried yarn. |
--
I like to start these with by making a magic ring, since it doesn't leave a hole in the center, but you can use whatever method you would like. My demonstration will be with the magic ring.
Let me lead off with a picture, which I will then explain:

This is color A. The yarn goes over my index finger, down behind my middle finger, and wraps around my middle finger twice. I'm holding the loose end squeezed between my middle and ring fingers (you can't see that), and the end coming from the skein between my middle finger and thumb. It's a bit odd at first, but it works.
Insert your hook under both the loops on your middle finger and catch the strand coming down from your index finger in the back, like this:

Pull that strand through both loops of your middle finger. Then chain two. Here's what it should look like:
 |
| Two loops still on the middle finger, and the chain attached to it. |
Now slide the two loops off your middle finger, but keep them together. That's the ring you'll be working into.
Double crochet with a carried strand are a little thicker at the base than double crochet without a carried strand, and most people generally would like consistent results. That means you'll have to start carrying the second color from the very beginning. Leaving a tail long enough to weave in later, hold the end of color B behind your working yarn, like so:

Work two double crochet into the center ring, remembering to work around the strand of color B as you do. Chain two, and work three more double crochet into the center ring. This is two sides, with one corner in between them. It should look like this:
.JPG)
Now you are going to change colors in the corner. Drop the working yarn to the front of your work, and pick up color B.
.JPG)
Chain two with color B. When you do this, you will notice that your first chain is actually in color A. This is fine, and it will make sure your square splits exactly in half along a diagonal line.

Work three double crochet into the center ring, remembering to crochet over the carried strand of color A. When you finish, you'll see all four sides of the square, but only three corners:

Before you work the last corner, you have to do the "magic" part of the magic ring. Draw the loop on your hook out very large to make sure it won't accidentally undo your work:

Push all the stitches together to expose part of the magic ring, so you can see what you'll be tugging on. Take the tail end of color A and tug just until one of the loops begins to move. Note which loop it is and which direction it's sliding.

Now take that loop and pull it slowly so that the other loop begins to tighten. Pull it snug.


Double crochet with a carried strand are a little thicker at the base than double crochet without a carried strand, and most people generally would like consistent results. That means you'll have to start carrying the second color from the very beginning. Leaving a tail long enough to weave in later, hold the end of color B behind your working yarn, like so:

Work two double crochet into the center ring, remembering to work around the strand of color B as you do. Chain two, and work three more double crochet into the center ring. This is two sides, with one corner in between them. It should look like this:
.JPG)
.JPG)

Work three double crochet into the center ring, remembering to crochet over the carried strand of color A. When you finish, you'll see all four sides of the square, but only three corners:

Before you work the last corner, you have to do the "magic" part of the magic ring. Draw the loop on your hook out very large to make sure it won't accidentally undo your work:

Push all the stitches together to expose part of the magic ring, so you can see what you'll be tugging on. Take the tail end of color A and tug just until one of the loops begins to move. Note which loop it is and which direction it's sliding.

Now take that loop and pull it slowly so that the other loop begins to tighten. Pull it snug.

Now grab the tail again and tug that until the loop is gone and the center hole has closed up.

Insert your hook into the loop again and pull the working end of color B to draw it snug around the hook again.

To make the last corner, drop color B to the front and chain two with color A. Again notice the first chain is in color B, and the second is in color A. All that's left to finish the round is to join. Insert your hook into the first double crochet (skip the initial chain-two), and work a slip stitch.

On to the second round. You can chain three (the traditional turning chain for double crochet) or two (for a more snug turning chain) to start the next round. I prefer the standing start, which is much more difficult to distinguish from a regular double crochet. Here's how to do it.
Draw the loop on your hook a bit longer:

Using your finger to hold the loop in place (as above), yarn over with the loop:


Yarn over with the working yarn and pull through the "yarnover" formed by the two sides of the loop. Then yarn over with the working yarn again and pull through the remaining two loops, to form a standing double crochet.

This stitch will be a little odd and a little wobbly until you smoosh some more stitches in around it, so just keep going. Remembering to crochet over the carried strand of color B, work one double crochet into the same stitch this one is attached to, and one double crochet into the next stitch. You should have three double crochets in the side of the square:

This corner is easy, since it's just in color A. Into the corner space, work two double crochet, chain two, and then two more double crochet. This is what it should look like:

Work one double crochet into each of the next three stitches:

Now you're at a two-color corner. You'll work half the corner, switch colors, and work the other half in the second color. To start, work two double crochet in the corner space:

Drop the working yarn to the front, and pick up color B. Chain two, and work two double crochet into the corner space, crocheting over the carried strand of color A:
 |
| Notice chain #1 is color A, #2 is color B |
Continue as before, working one double crochet into each stitch, and [two double crochet, chain two, two double crochet] in each corner space, until you reach the last corner. In the last corner, work two double crochet in color B, drop the working yarn to the front and pick up color A, chain two, and work two more double crochet into the corner space.
If you want to make a bigger square, continue to work each round in the same way, with more double crochets on the sides in each round.
To finish, slip-stitch into the first double crochet of the round (the standing one). Without removing your hook from the last loop, cut both yarn ends a few inches away to leave enough to weave in. Draw the loop until the end comes free:

Insert your hook from back to front into the first stitch of the round (the same one you just slip-stitched into), catch the tail, and pull it through to the back.

The downside to this square is the four ends you have to sew in on each one:

These squares make great patterns if you work up a bunch of them and sew them into blocks. The backs aren't quite as pretty as the fronts, but they would make a lovely blanket even so (perhaps lined with fabric on the wrong side?).
I hope you enjoyed this tutorial. Let me know if there's anything I can do to improve!
The back would look as good as the front if you turned your work with each row, I think.
ReplyDeleteThat would depend on your definition of "good". :) I prefer the "right side" of crochet stitches, which is why I love granny squares. So while turning with each row would defeat my personal purpose for this design, I'm sure others would find it suits their purposes quite nicely. Thanks for your input!
DeleteWould you please go back and review this for errata? Your photos don't follow as clearly against the written instructions as you may think, and sometimes it looks like you're either leaving out instructions or mistyping them. As in, sometimes you say to stitch 2dc where it seems like you mean 3. And you omit mention of chain stitches in a few places. I can't tell if I'm misunderstanding directions that you take for granted readers will know, or if you've actually got errors in the written instructions.
ReplyDelete